Now that you have learned to edit and have edited Screens 148 and 200 it is time to simulate the code - six NOPs and a jump back to the start. I have done just a "jump to start" program (the hardware guy's minimum standard. A favorite for the Z-80 set.) but then there would be nothing to see. So let us simulate.
Print out the chart in Section 7.5 on Page 31 of the DB004 document. It will help you understand what the simulator is doing.
Type in “so <cr>”. That will bring up the simulator and its control panel. Use the “F” key to single step through the program. Well OK. Node 100 is not the main focus. You can change that by using the “M” key. And change it back with the same key. You are now well into the program and you would probably like to see it from the start. That is what the “A” key is for. Now you can start “F”ing from the beginning.
That is all you need to get you started running programs in the simulator. There are some other commands that will interest you if you want to go deeper. You can try them out on this simple program without getting into much trouble. When you are done the spacebar will get you out of the simulator.
Leave simulator - <spacebar>
Step/stop - “F”
Fast/slow - “S”
Go continuously - “D”
Back to beginning - “A”
Increase step size +1 - “V”
Decrease step size -1 - “C”
Increase step size +100 - “R”
Decrease step size -100 - “E”
Swap focus (yellow and red cores in the display) - “M”
Scroll through focus core's memory, increasing - “,”
Scroll through focus core's memory, decreasing - “.”
Display alternate core's memory or active core display - “/”
Display sizing
Taller - “Q”
Wider - “W”
Shorter - “Z”
Narrower - “X”
Select focus node. Use the “M” key to move the other node.
Left move - “J”
Right move - “;”
Up move - “K”
Down move - “L”
To move the block of displayed cores around
Left move - “U”
Right move - “P”
Up move - “I”
Down move - “O”
Saturday, October 15, 2011
Friday, October 14, 2011
Edit Something Simple
Edit screens 148 and 200 as shown below.
Screen 148: Note that only the line beginning with "smtm" needs to be changed.

Screen 200: A very simple program. Six NOPs and a jump back to the beginning.
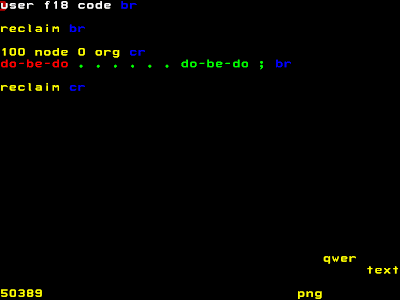
When you are done with the edits (don't forget to "save" your work) you will be ready to test this simple program on the simulator. Which I will cover in the next post.
Four Easy Steps - The Editor
Mastering the arrayForth/colorForth Editor (free download here) enough to get started is easy. There are only four critical concepts that you need to master. Before we start save a copy of “OkadWork.cf“ in a backup folder. All you need to do to get back where you were before is to restore the original to the working directory. So hack away.
So lets get started. Bring up colorFORTH and “200 edit <cr>”. For those of you not familiar with old electromechanical TTY nomenclature <cr> = <Enter <--- > - actually there is <lf> too but we won't go into that. You are now in the editor.
The first thing you will want to do is move the cursor around. For that use the “J” “K” “L” and “;” keys. Practice. If you get too far lost hit the <space bar (is that like the canteen in Mos Isley?)> and you are out of the editor and the clutches of the Tanaka Sisters (dang).
To get back in clean you can type “bye” which exits the program and then restart it. You will need to do “200 edit” again to get back to the editor. There are probably better ways to do this. But this something simple and easy to understand. Easy does it to start. If you want to continue where you left off type "e" <cr>.
OK. You can move the cursor. Which is looks a little like a PacMan muncher and works similarly (how retro). You can now use the “N” key to munch a word at a time. OK. You have now cleared out stuff you want to change.
Now you want to add a word or fifty to your code. Pick a color (see chart below) and type in the word you want to add. <cr> and the word is added. You can now add another word. <backspace> will erase a word if you typed it incorrectly. When you are done typying words of that color hit <Mos Eisely> (more commonly referred to as <spacebar>) and you are back in the editor. You can now erase any wrongly entered words or if you need to change a word's color by using the cursor and “A” key.
One last thing – when entering numbers you can use the “F1” key to toggle between decimal and hexidecimal entry modes.
And that is enough to begin using the editor. There are other things you can do with the control keys but it will be easy enough to master them once you have the above basics down. Don't forget to "save" when you are all done and out of the editor.
Color Words:
White - “R” - comment
Yellow - “U” - interpreted words
Red - “I” - define Forth word
Green - “O” - compiled words and numbers
Blue - “X” - display macro (mostly text formatting for now)
Magenta - “,” - variable
Grey - “Z” - compiler feedback
Cyan - “.” - compiled macro call
Of those colors only the first four are necessary to get you started. Number five (Blue) is nice for those of you who like pretty text.
Who TF Are We?
My name is M. Simon and I'm an independent contractor with a great interest in the GreenArray chips and the colorForth system used to program them.
And just to help Google out: I like the GA144 chip.
And just to help Google out: I like the GA144 chip.
Subscribe to:
Posts (Atom)